
Grab your favorite heavy hitter jacket and clear some space on the workbench because we are about to fuse high fashion with structural engineering. There is something intoxicating about the tactile resistance of twelve ounce denim meeting the sharp precision of a size 10 beading needle. We are not just decorating; we are executing Simple Bead Embroidery to transform a mass produced garment into a bespoke artifact. Feel the weight of the cotton twill. It is a rugged, porous substrate that provides the perfect tensile strength to support the added mass of glass and stone without sagging. When you run your thumb over a pile of Grade A seed beads, you feel that cool, glass click that promises a luminous finish. This project is the ultimate intersection of grit and glamour. We are using the denim's weave as a natural grid to guide our geometry. By the time we are finished, your jacket will not just catch the light; it will command the entire room with structural integrity and shimmering brilliance.
THE STUDIO KIT
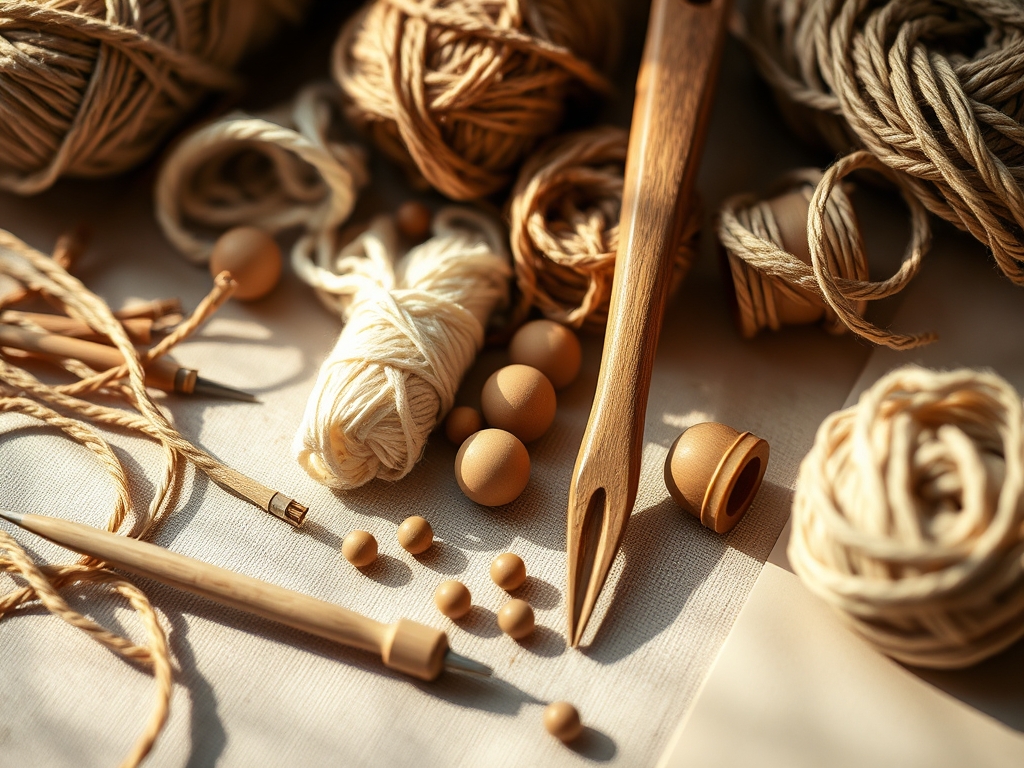
To master Simple Bead Embroidery, you need a kit that respects the physics of the fabric. Your primary tool is a size 10 or 12 beading needle, which features a consistent diameter from eye to tip to prevent snagging the denim's warp threads. For the thread, skip the cotton and reach for nylon monofilament or thermally bonded polyethylene like Fireline. These materials offer superior tensile strength and zero stretch, ensuring your beads stay locked in place even after years of wear. You will also need a pair of precision calipers to measure the spacing of your motifs and a tailor's awl to pre-pierce thicker seams or flat felled areas where the needle might struggle.
Material Substitutions are your best friend when the supply shop is closed. If you lack specialized beading thread, use a high quality polyester upholstery thread coated in beeswax to reduce friction and prevent fraying. If you do not have a dedicated embroidery hoop, a sturdy spring tension hoop or even a heavy duty binder clip setup can maintain the necessary surface tension across the denim. Always keep a bone folder nearby to burnish the back of your stitches, ensuring the knots sit flush against the fabric and do not irritate your skin.
THE TEMPO
The Maker's Rhythm is all about managing your internal clock alongside the physical demands of the craft. Simple Bead Embroidery is a marathon, not a sprint. Expect to spend approximately thirty minutes on the Mapping Phase, where you use chalk or a heat erasable pen to plot your coordinates. The Execution Phase varies by complexity, but a standard shoulder piece typically requires four to six hours of active stitching. Finally, the Finishing Phase takes about twenty minutes to secure ends and steam the fabric to relax any puckering caused by thread tension.
This rhythm is governed by the ergonomics of repetitive motion. To avoid hand fatigue, work in ninety minute bursts followed by a ten minute stretch. The density of the denim requires significant thumb pressure to push the needle through the indigo dyed fibers. Using a metal thimble is not just a suggestion; it is a mechanical necessity to protect your fingertips from the repetitive force required to pierce the dense twill weave.
THE CORE METHOD
1. Mapping the Topography
Before the first bead touches the cloth, you must map your design using a chalk liner or silver marking pencil. Denim is a living fabric that shifts on the bias, so use your calipers to ensure symmetry across the lapels. By marking your anchor points first, you account for the way the fabric drapes over the body's natural curves.
Mastery Tip: Understand the grainline. Denim is a twill weave characterized by diagonal ribs. Aligning your embroidery with these ribs prevents the fabric from skewing under the weight of the beads, maintaining the garment's original silhouette.
2. Securing the Foundation
Anchor your thread with a waste knot two inches away from your starting point. Thread your needle and bring it up through the denim from the wrong side. The goal is to create a mechanical bond between the thread and the cellulose fibers of the cotton.
Mastery Tip: Leverage capillary action by lightly waxing your thread. The wax fills the microscopic gaps in the thread's ply, reducing the surface area that can catch on the denim fibers and preventing the thread from tangling during long passes.
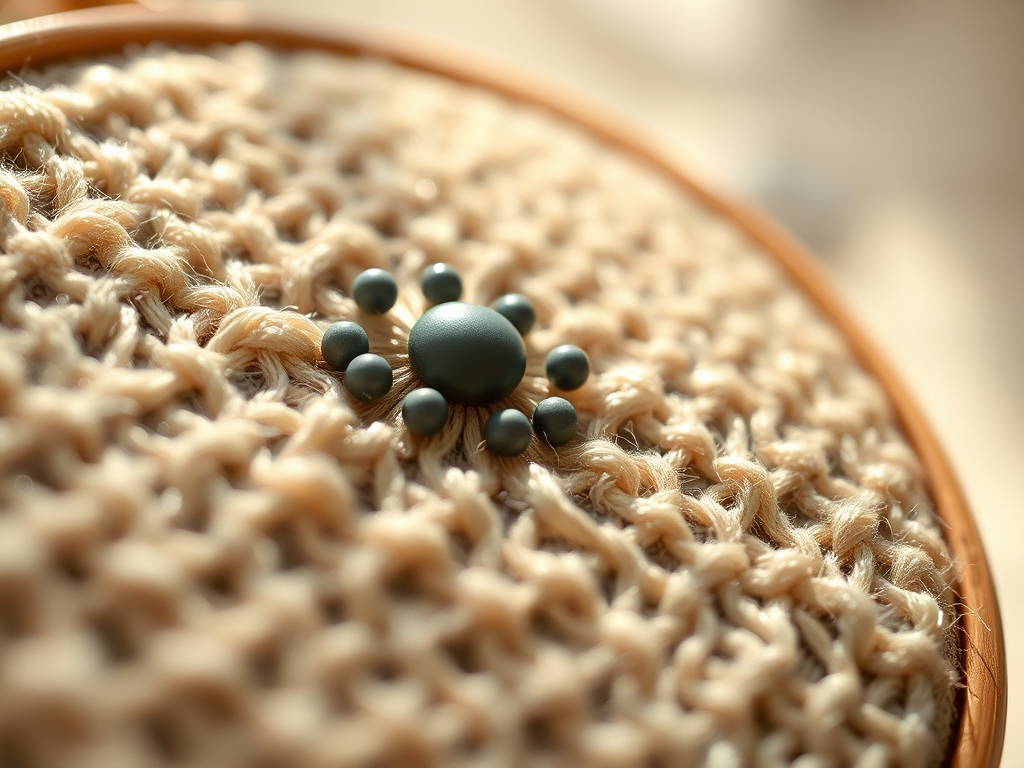
3. The Backstitch Technique
For maximum durability in Simple Bead Embroidery, use the reinforced backstitch. String two beads, pierce the fabric, and then bring the needle back up between the first and second bead. Pass the needle through the second bead again before adding more.
Mastery Tip: This creates a structural bridge. By looping back through the beads, you distribute the weight across multiple points of contact, which prevents the "sawing" effect where the thread cuts into the denim over time.
4. Managing Tension
Maintain a consistent pull on the thread. If the tension is too high, the denim will pucker; if it is too low, the beads will flop and snag on external objects. The thread should be taut enough to sit flush but loose enough to allow the fabric to flex.
Mastery Tip: This is basic tensile dynamics. Cotton denim has a high modulus of elasticity compared to nylon thread. If you over tension, the fabric will win the tug of war, resulting in a distorted, wavy seam that ruins the professional finish.
5. Transitioning Between Elements
When moving from one cluster to another, do not carry the thread more than half an inch on the backside. Instead, tie off and restart. Long "floats" on the interior of a jacket are magnets for coat hangers and jewelry, which can snap your hard work in seconds.
Mastery Tip: Consider the friction coefficient. A shorter thread path reduces the likelihood of snagging and minimizes the internal abrasion against your undergarments, preserving both the embroidery and your clothes.
6. The Perimeter Lock
When you reach the end of a line, pass the needle through the last three beads twice. This creates a redundant locking mechanism that ensures the entire row won't unravel if a single stitch fails during a heavy wash cycle.
Mastery Tip: This is a principle of mechanical redundancy. In engineering, you never rely on a single point of failure. Doubling the thread at the terminus increases the shear strength of the final knot significantly.
7. Burnishing the Reverse
Once the stitching is complete, turn the jacket inside out. Use a bone folder or the back of a spoon to firmly rub the knots and thread paths. This flattens the profile of the embroidery on the interior of the garment.
Mastery Tip: Burnishing increases the surface area contact between the thread and the denim. By pressing the knots into the weave, you lock them into the "valleys" of the twill, making them less prone to loosening through mechanical wear.
THE TECHNICAL LEDGER
Maintenance & Longevity: To preserve your Simple Bead Embroidery, always wash the jacket inside out in a mesh laundry bag on a delicate cycle. Avoid the dryer at all costs. The high heat can cause the glass beads to expand and crack or the nylon thread to reach its glass transition temperature and melt.
Material Variations: For a sustainable approach, use recycled glass beads or vintage buttons sourced from estate sales. If you want a premium look, invest in 24k gold plated Miyuki Delicas. These beads are manufactured with extreme precision, ensuring a uniform gauge that makes geometric patterns look like liquid metal.
The Correction:
- Puckering: If the fabric bunches, your tension is too high. Snip the thread, massage the denim to relax the fibers, and restart with a lighter touch.
- Loose Beads: If beads are "rolling," you missed the backstitch. Retroactively thread a new line through the existing beads and anchor it to the denim every three beads to stabilize.
- Needle Breakage: If your needle snaps, you are hitting a heavy seam. Use your awl to create a pilot hole before attempting to pass the needle through.
Studio Organization: Store your beads in modular acrylic containers sorted by size and finish. To prevent degradation of the denim and thread, keep the project in a cool, dry place away from direct UV light, which can weaken nylon fibers over time.
THE FINAL REVEAL
Look at that transformation! Your jacket has gone from a basic utility piece to a high energy work of art. The way the light dances off the beads against the rugged, matte texture of the denim is pure magic. You have successfully navigated the physics of fiber and the precision of beadwork to create something truly iconic. This is not just a jacket anymore; it is a testament to your skill and your eye for detail. Wear it with pride, knowing every bead is anchored with professional grade integrity.
STUDIO QUESTIONS
What is the best needle for denim beading?
A size 10 or 12 beading needle is ideal. Its slim, consistent gauge allows it to pass through dense twill without creating large, unsightly holes or snagging the internal fibers of the cotton.
Can I use regular sewing thread for beads?
It is not recommended. Standard cotton thread lacks the tensile strength and abrasion resistance needed for beads. Use nylon or bonded polyethylene to ensure the embroidery survives the weight and friction of daily wear.
How do I stop the denim from puckering?
Maintain even tension and use a hoop to keep the fabric taut. If puckering occurs, your stitches are too tight. The thread should rest on the fabric surface without pulling the weave together.
Is it safe to machine wash beaded denim?
Yes, if you use a mesh bag and a cold, delicate cycle. Never use a dryer, as the heat can damage the thread's structural integrity and cause the beads to become brittle or lose their finish.

