
The cold, clinical bite of dead soft copper wire against your fingertips is the first sign that you are about to create something structural. You can feel the tensile strength vibrating through the spool as you prepare for Simple Wire Wrapping; it is a delicate dance between the rigidity of metal and the organic curves of a gemstone. When you hold a raw crystal, you are not just holding a rock; you are holding a geometric puzzle defined by its cleavage planes and internal lattice. My studio is currently a chaotic symphony of clicking pliers and the metallic scent of brass. We are diving into the physics of tension today. To master this craft, you must understand how the gauge of your wire interacts with the Mohs hardness of your stone. If you pull too hard, you risk fracturing the crystal; if you are too gentle, the piece lacks structural integrity. We are looking for that sweet spot where the metal yields to your will but maintains enough springback to lock the stone in place forever.
THE STUDIO KIT

To execute professional Simple Wire Wrapping, your kit must prioritize precision over quantity. Start with a pair of digital calipers to measure the exact dimensions of your crystals; this ensures your wire lengths are mathematically sound rather than guessed. You will need chain-nose pliers with smooth interior jaws to prevent marring the metal surface and flush cutters that leave a perfectly flat edge on your wire ends. For the wire itself, 20-gauge dead soft wire is the industry standard for frames, while 26-gauge is ideal for fine weaving. The tactile feedback of dead soft wire allows for intricate bends without immediate work-hardening.
Material Substitutions: If you cannot source sterling silver or copper, high-quality stainless steel is a viable alternative, though its higher yield strength requires more hand force. For a sustainable twist, you can strip the insulation from salvaged electrical copper wire, provided you burnish it with a polishing cloth to remove any oxidation before you begin.
THE TEMPO
The "Maker's Rhythm" is a three-phase process that balances frantic energy with meditative precision. Phase one is the Preparation Phase (15 minutes), where you clean your stones and straighten your wire using nylon-jaw pliers to remove any kinks. Phase two is the Structural Phase (30 to 45 minutes), which is the heart of Simple Wire Wrapping. This is where you build the "cradle" or frame. Finally, phase three is the Refinement Phase (20 minutes), where you tuck your ends, polish the metal, and check the ergonomic flow of the pendant against the skin. Total time per piece usually clocks in at around 75 minutes once you find your flow.
THE CORE METHOD
1. The Pointed Quartz Pillar
Quartz grows in a hexagonal system, meaning it has six distinct faces. To wrap this, create a "U" shape with your base wire and align it with the flat bottom of the crystal. Mastery Tip: Utilize the principle of friction fit by ensuring the wire sits exactly in the center of the crystal's facets. This prevents the stone from rotating within the harness.
2. The Tumbled Oval
Ovals lack natural notches, making them the ultimate test of Simple Wire Wrapping. You must create a "basket" by twisting two wires at the base and splaying them upward. Mastery Tip: This relies on mechanical interlock; the wire must be tensioned at the widest point of the stone (the equator) to prevent it from slipping out vertically.
3. The Triangular Delta
Triangular stones like trillion-cut gems have sharp corners that can act as stress risers. Use your round-nose pliers to create soft loops at each corner to distribute the pressure. Mastery Tip: By increasing the surface area of the wire contact at the corners, you reduce the risk of the wire snapping under sudden impact.
4. The Raw Rough Nugget
Irregular stones require a "freeform" approach. Follow the natural valleys of the stone's surface. Mastery Tip: Use the stone's porous or uneven texture to your advantage by "locking" the wire into natural indentations, which increases the total stability of the wrap.
5. The Flat Cabochon
A cabochon has a flat back and a domed top. You must create a frame that sits slightly behind the widest part of the stone. Mastery Tip: This involves capillary action during the cleaning phase; ensure no oils remain between the wire and stone, as lubrication will cause the cabochon to slide out of its seat.
6. The Heart Shape
The cleft at the top of a heart is a natural anchor point. Cross your wires here to create a secure bail. Mastery Tip: The structural integrity of a heart wrap depends on the tension at the bottom point; if the bottom is loose, the top "shoulders" will inevitably widen and release the stone.
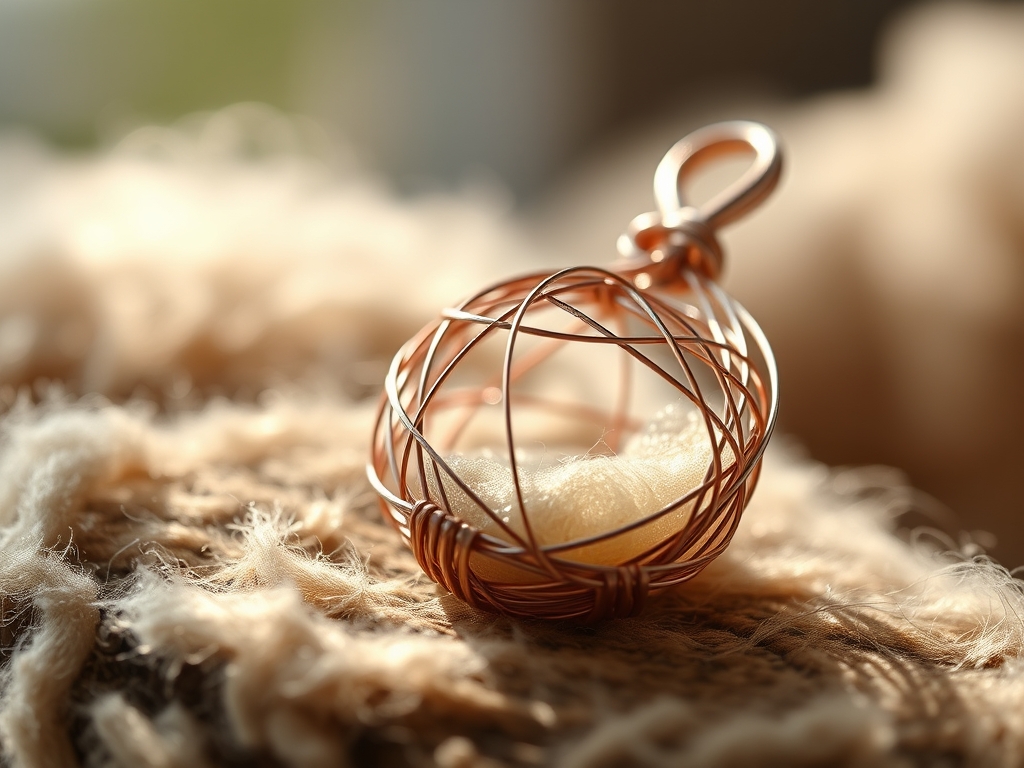
7. The Spherical Bead
Wrapping a sphere is like trying to catch water. You must create a "cage" of at least three vertical ribs. Mastery Tip: Use work-hardening techniques by lightly tapping the finished wire cage with a chasing hammer. This hardens the molecular structure of the metal, making it rigid enough to hold the round shape.
THE TECHNICAL LEDGER
Maintenance & Longevity: Over time, copper and silver will oxidize. To maintain the lustre, store your jewelry in airtight bags with anti-tarnish strips. Avoid ultrasonic cleaners for porous stones like turquoise or opal, as the high-frequency vibrations can shatter the internal structure.
Material Variations: For a premium feel, use 14k gold-filled wire, which features a thick layer of gold mechanically bonded to a brass core. It offers the ductility of gold with the strength of brass. For eco-conscious makers, look for "Refined" silver wire, which is processed from 100 percent recycled sources.
The Correction:
- The Slip: If the stone is wobbling, use your flat-nose pliers to give the wire a tiny "Z-bend" or kink. This shortens the wire length and increases tension.
- The Mar: If you scratched the wire, use a burnishing tool or high-grit sanding stick (up to 8000 grit) to buff out the mark.
- The Snip: If you cut the wire too short, do not try to stretch it. Use a jeweler's saw to cleanly remove the frame and start over; metal fatigue from over-stretching will always lead to failure.
Studio Organization: Store your wire on a spool rack to prevent "bird-nesting." Organize your crystals by specific gravity or hardness to ensure that softer stones like fluorite are not scratched by harder ones like quartz during storage.
THE FINAL REVEAL
There is nothing quite like the moment you lift a finished piece of Simple Wire Wrapping and feel its weight and balance. When the light hits the facets of the crystal and the polished sheen of the metal, you see the harmony of physics and art. Your stone is no longer just a fragment of the earth; it is a secured, wearable sculpture. The wire should feel like an extension of the stone, a metallic vine that grew specifically to hold that geometric treasure. Shake it gently; if it does not rattle, you have achieved the perfect tension.
STUDIO QUESTIONS
What is the best wire gauge for beginners?
For Simple Wire Wrapping, 20-gauge dead soft wire is the gold standard. It provides enough tensile strength to hold the stone's weight while remaining pliable enough for manual manipulation without specialized heavy machinery.
How do I stop my wire from breaking?
Wire breaks due to work-hardening. Every time you bend metal, the molecular structure becomes more brittle. To prevent snapping, plan your moves in advance and avoid repeated bending and straightening in the same spot.
Can I wrap stones without a flat back?
Yes, irregular or "rough" stones are perfect for Simple Wire Wrapping. You simply need to identify the stone's center of gravity and ensure your wire cage encompasses the widest dimensions to prevent the stone from falling out.
How do I get a professional finish?
The secret is in the burnishing. Use a steel burnisher or a tumbling machine with stainless steel shot to compress the surface of the metal. This increases shine and hardens the wire for long-term durability.
Why is my wire turning my skin green?
This is a chemical reaction between skin acids and copper. To prevent this, seal your finished Simple Wire Wrapping project with a specialized jewelry-grade microcrystalline wax or a clear protective coating to create a barrier.

