

Close your eyes and listen to the crisp, rhythmic snap of 100lb cardstock yielding to a bone folder. There is a specific kind of magic in the friction between a steel needle and the fibrous grain of high-quality paper. You are about to transform a chaotic stack of loose sheets into a structural masterpiece. This journey into an Intro to Bookbinding starts with understanding that a journal is not just a collection of thoughts; it is a mechanical assembly held together by tension and geometry. We are moving beyond the flimsy staples of school notebooks and stepping into the world of archival permanence. Feel the weight of the waxed linen thread in your hands. It has a slight tackiness, a grip designed to lock into the paper pores and hold your memories under constant pressure. We are building something that breathes, something with a spine that can withstand a lifetime of opening and closing. Grab your coffee and clear your workbench. We are about to turn raw pulp into a legacy.
THE STUDIO KIT
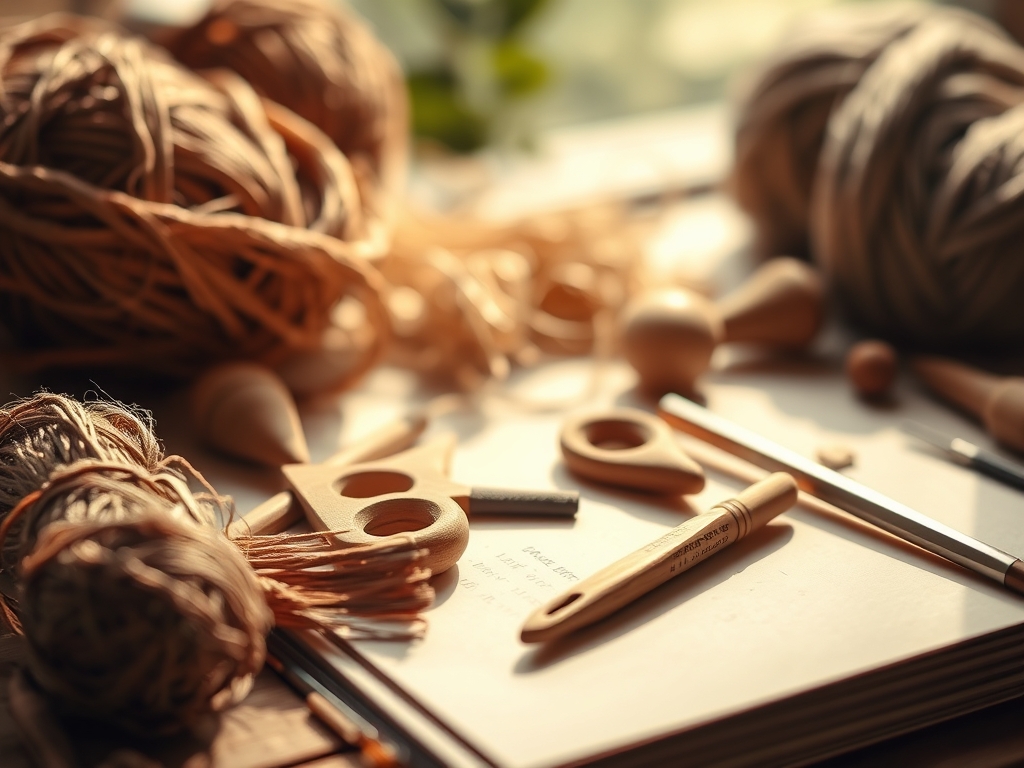
THE STUDIO KIT
To master the art of the stitch, you need more than just a needle and thread; you need a kit that respects the tensile strength of your materials. Your primary tool is the bone folder, traditionally carved from bovine bone for its unique ability to burnish fibers without leaving a shiny, synthetic residue. You will also need a tapered awl for piercing clean, uniform holes through multiple "signatures" (the technical term for folded groups of paper). For the thread, look for 4-ply waxed linen. The wax acts as a lubricant, reducing the friction that can cause "paper cuts" in your binding holes, while also providing enough surface tension to prevent the knots from slipping over time.
For those looking at Material Substitutions, if you cannot find a bone folder, a smooth agate stone or even a heavy-duty plastic spatula can work, though they lack the organic density of bone. If you lack a professional awl, a large-gauge darning needle pushed through a cork can serve as an ergonomic makeshift piercer. For the paper, ensure you are using short-grain paper; the grain must run parallel to the spine to prevent the pages from waving or resisting the fold. Use a caliper to measure the thickness of your total text block to ensure your cover wrap is perfectly sized.
THE TEMPO
The "Maker's Rhythm" is a meditative state where your hands move faster than your internal critic. For a standard 5.5 by 8.5 inch journal, expect the Preparation Phase (folding and punching) to take roughly thirty minutes. This is where precision matters most; a millimeter of deviation in your hole alignment will result in a skewed spine. The Stitching Phase is the heart of the project, requiring forty-five to sixty minutes of focused, rhythmic pulling and looping. Finally, the Curing Phase takes about twelve hours. This is when you place the finished book under a heavy press (or a stack of heavy textbooks) to flatten the fibers and allow the thread to settle into its new home. Respecting this tempo ensures your book remains a structural unit rather than a loose collection of parts.
THE CORE METHOD
1. The Single Section Pamphlet Stitch
This is the foundational entry point for any Intro to Bookbinding enthusiast. It involves a three-hole or five-hole pattern through a single signature. Start by threading your needle and entering the center hole from the inside.
Mastery Tip: This stitch relies on lateral tension. By keeping the thread taut as you move through the stations, you create a structural bridge that prevents the signature from sliding vertically within the cover.
2. The Kettle Stitch
This is the "handshake" of bookbinding. It is used to link one signature to the next at the head and tail of the book. It creates a series of interlocking loops that distribute the stress of opening the book across the entire spine.
Mastery Tip: The Kettle Stitch utilizes mechanical interlocking. Each loop acts as a tiny knot that prevents a single broken thread from unraveling the entire volume, a concept known as "redundant structural integrity."
3. The Long Stitch
A favorite for exposed-spine journals, the Long Stitch creates beautiful vertical lines on the exterior. The thread travels directly from the signature to the cover material, often leather or heavy felt.
Mastery Tip: Pay attention to friction coefficients. Because the thread is exposed, it is subject to more wear. Using a thicker gauge of thread here increases durability against external abrasion.
4. The Coptic Stitch
This ancient method allows the book to lay completely flat when opened. It involves a chain-link pattern across the spine that connects the covers and the signatures in one continuous flow.
Mastery Tip: The Coptic stitch relies on fulcrum points. Each loop acts as a hinge, allowing for 360 degrees of rotation without stressing the paper grain.
5. The French Link Stitch
Often used in conjunction with tapes or ribbons, this stitch creates a decorative "X" pattern across the spine. It provides incredible stability for thicker journals with many signatures.
Mastery Tip: This stitch increases the surface area of the binding. By crossing the threads, you distribute the pulling force over a wider section of the paper, preventing "tearing" at the entry points.
6. The Secret Belgian Binder
This unique method binds the front and back covers together first, then weaves the signatures into the existing framework. It is visually stunning and incredibly sturdy.
Mastery Tip: This technique utilizes independent suspension. Because the signatures are woven into a pre-constructed frame, the stress of the cover opening is entirely decoupled from the stress on the pages.
7. The Japanese Hole Binding (Yotsume Toji)
A classic four-hole stab binding used for single sheets rather than folded signatures. It involves wrapping the thread around the spine itself.
Mastery Tip: This method relies on compression. The thread acts as a clamp, holding the loose sheets together through sheer force. Ensure your holes are at least 1cm from the edge to prevent "blowouts" under high tension.
8. The Buttonhole Stitch
This involves cutting a large window in the spine of the cover, exposing the colorful threads and the folds of the signatures underneath.
Mastery Tip: This stitch tests the shear strength of your cover material. Since you are removing a portion of the spine, the remaining material must be high-density to maintain the book's shape.
9. The Cross-Stitch Binding
A variation of the Long Stitch where threads cross over each other to form a decorative lattice. It is highly aesthetic and provides a firm grip on the text block.
Mastery Tip: This uses triangulation for stability. Like a bridge truss, the diagonal threads prevent the signatures from shifting diagonally, ensuring a perfectly square book.
THE TECHNICAL LEDGER
Maintenance & Longevity: To keep your journals in archival condition, store them upright and away from direct UV light, which can degrade the lignin in the paper. Every few years, you can lightly buff the spine with a tiny amount of beeswax to keep the thread supple.
Material Variations:
- Sustainable: Use hemp cord and recycled "crush" paper made from organic residues like citrus or coffee.
- Premium: Opt for goatskin leather covers and 100% cotton rag paper, which has no acid content and will last for centuries.
The Correction:
- The Loose Signature: If a signature feels wobbly, you likely missed a Kettle Stitch. Use a "blind needle" to retroactively weave a support thread through the existing loops.
- The Torn Hole: If the paper rips during stitching, reinforce the area with a small strip of archival linen tape or "Tyvek" before re-punching.
- The Thread Knot: If your thread tangles, do not pull. Use a drop of sewing machine oil on a pin to gently tease the fibers apart.
Studio Organization: Store your paper flat to prevent "warping." Keep your needles in a magnetized tray and store your waxed thread in a sealed container to prevent the wax from drying out or attracting dust.
THE FINAL REVEAL
Look at that! You have just transitioned from a casual crafter to a structural engineer of the written word. Your finished journal should feel dense, balanced, and ready for a fountain pen. When you run your thumb along the spine, you should feel the consistent, rhythmic bumps of the stitches; a tactile map of the work you just put in. This book is now a composite material object, stronger than the sum of its parts. Go ahead, open it to the middle. See how it stays open? That is the result of perfect tension and a deep respect for the physics of the fold. You didn't just make a notebook; you built a vessel.
STUDIO QUESTIONS
What is the best thread for an Intro to Bookbinding?
Waxed linen thread is the gold standard. The wax prevents tangling and "locks" the stitches in place through friction. It has high tensile strength and does not stretch over time, ensuring your book remains tight and secure for decades.
Can I use regular printer paper for my journal?
While possible, printer paper is "grain-long," which causes it to resist folding and "buckle" when bound. For the best results, use short-grain, acid-free paper with a weight of at least 80gsm to ensure the pages feel substantial and durable.
How do I prevent my paper from tearing at the holes?
Always use a sharp awl and punch from the inside of the fold outward. This creates a "volcano" shape that guides the needle. Additionally, avoid over-tightening your thread; you want the tension of a guitar string, not a garrote.
What is the purpose of a bone folder?
A bone folder is used to create sharp, permanent creases in paper by compressing the cellulose fibers without damaging them. It is also essential for burnishing the spine and smoothing out air bubbles when gluing covers or decorative endpapers.

