
Imagine the tactile sensation of a heavy, translucent block of glycerin resting in your palm; it is cool, dense, and possesses a surprising amount of structural integrity. You are about to transform this inert mass into a masterpiece of functional art. If you are ready for your First Time Soap Pouring adventure, prepare for a sensory explosion of fragrance and color. We are moving beyond basic kitchen crafts into the realm of domestic engineering. This process is not just about bubbles; it is about the physics of phase changes and the delicate balance of chemical suspension. You will feel the resistance of the soap as you slice through its crystalline structure, hearing that satisfying "clink" against the glass. We are going to master the melt, command the pour, and create something so professional your friends will swear you bought it at a high-end boutique. Grab your safety goggles and let us dive into the beautiful, bubbly science of the studio.
THE STUDIO KIT
To execute a flawless pour, you must respect the viscosity of your medium. Your primary material is the melt and pour base, typically a blend of fats and glycerin that has already undergone saponification. You will need a heat-resistant glass measuring pitcher; the spout acts as a precision nozzle for controlling flow rate. A rotary cutter or a sharp chef's knife is essential for breaking down the block into uniform cubes to ensure an even thermal distribution. For stirring, skip the wooden spoons which can be porous and trap air; instead, use a stainless steel stir rod or a silicone spatula to minimize turbulence.
You also need a high-quality silicone mold. These are preferred for their tensile strength and flexibility, allowing for an easy release without compromising the soap's surface finish. A digital infrared thermometer is your most important diagnostic tool; you must monitor the temperature to avoid scorching the delicate fragrance oils. For finishing, keep a spray bottle of 99 percent isopropyl alcohol nearby. This acts as a surface tension breaker to eliminate unsightly bubbles.
Material Substitutions: If you lack a professional silicone mold, you can use recycled plastic containers, provided they are flexible enough to be manipulated. If a rotary cutter is unavailable, a jeweler's saw or a thin wire cheese cutter can produce clean, precise slices through the soap base without crushing the internal grain of the material.
THE TEMPO
The "Maker's Rhythm" is a dance between heat and solidification. For your First Time Soap Pouring session, allocate approximately ninety minutes. The preparation phase, including dicing the base and organizing your ergonomic workspace, takes twenty minutes. The melting phase requires fifteen minutes of intermittent heating to reach the target temperature of 145 degrees Fahrenheit. Once the soap is fluid, you have a "working window" of about five to seven minutes before the viscosity increases and a skin begins to form. Finally, the curing phase is the test of patience; the soap must remain undisturbed for at least four to six hours to reach maximum structural density.
THE CORE METHOD
1. Precision Slicing and Volume Calculation
Begin by cutting your soap base into uniform one-inch cubes. This is not just for aesthetics; uniform size ensures that every piece melts at the same rate, preventing the outer edges from overheating while the center remains solid. Use your rotary cutter to apply downward pressure, maintaining a vertical alignment to keep the cubes consistent.
Mastery Tip: This step relies on the principle of thermal mass. Smaller, uniform cubes increase the surface area-to-volume ratio, allowing heat to penetrate the core of the material more efficiently and preventing "hot spots" that can degrade the soap's clarity.
2. The Controlled Thermal Melt
Place your cubes in the glass pitcher and heat in short bursts. If using a microwave, stick to thirty-second intervals. Stir gently between bursts using your stainless steel rod. You are looking for a smooth, fluid state without any visible lumps. Use your infrared thermometer to ensure the temperature does not exceed 160 degrees Fahrenheit, as excessive heat can cause the glycerin to "sweat" later.
Mastery Tip: This is a study in phase transition. By keeping the temperature below the scorching point, you preserve the ply and moisture content of the glycerin, ensuring the finished product remains humectant and skin-friendly.
3. Fragrance and Color Integration
Once the base is fluid, it is time to add your aesthetic elements. Add your liquid micas or pigments first, stirring slowly to avoid incorporating air. Next, add your fragrance oils at a ratio of approximately 0.5 ounces per pound of soap. Stir for a full minute to ensure the oil is fully emulsified within the soap matrix.
Mastery Tip: This involves molecular suspension. If the soap is too cool, the fragrance oil will not bond correctly and may "leak" out of the finished bar. If it is too hot, the aromatic compounds will flash off and disappear into the air.
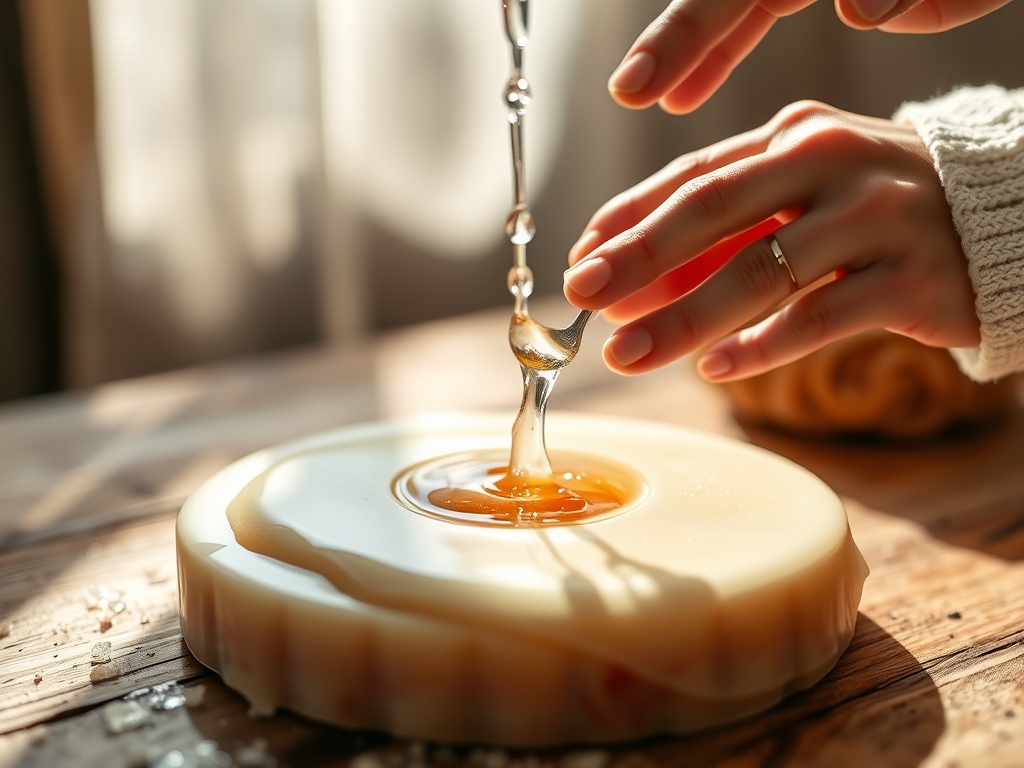
4. The Laminar Flow Pour
Position your mold on a level surface. Pour the soap in a slow, steady stream into the lowest point of the mold. This is known as a laminar flow, which prevents air from being trapped under the liquid. Fill the mold until the liquid reaches the very top edge, taking advantage of the soap's natural capillary action to fill every detail of the mold design.
Mastery Tip: Understanding surface tension is key here. By pouring slowly and from a low height, you reduce the kinetic energy of the liquid, which prevents the formation of bubbles and ensures a glass-like finish on the soap's surface.
5. The Isopropyl Finish
Immediately after pouring, spritz the surface of the liquid soap with isopropyl alcohol. You will see the tiny bubbles on the surface vanish instantly. This does not affect the chemistry of the soap; it simply breaks the surface tension of the bubbles, allowing the air to escape before the soap sets.
Mastery Tip: This is a professional burnish technique. The alcohol evaporates almost instantly, leaving behind a perfectly smooth, professional-grade surface that reflects light evenly and enhances the visual depth of the colors.
THE TECHNICAL LEDGER
Maintenance & Longevity: To keep your tools in peak condition, wash them with warm water immediately after use. Do not use abrasive scrubbers on silicone molds, as micro-scratches will transfer to the surface of your future soap projects.
Material Variations:
- Sustainable: Look for "Palm Free" bases to reduce environmental impact.
- Recycled: You can grate down old scraps of melt and pour soap and incorporate them into a new pour as "confetti" for a zero-waste studio.
- Premium: Goat milk or hemp seed oil bases offer a higher gauge of luxury and different skin-feel properties.
The Correction:
- The Problem: The soap has "dew" or beads of water on it. The Fix: This is glycerin sweat caused by high humidity. Wrap the soap in airtight plastic film immediately after it cools.
- The Problem: Layers are separating in a multi-color pour. The Fix: Spritz the first layer with alcohol before pouring the second to create a chemical bond between the plys.
- The Problem: The fragrance is weak. The Fix: Check the "flash point" of your oil; you likely added it while the soap was too hot, causing the scent to evaporate.
Studio Organization: Store your soap bases in a cool, dry environment. Use an airtight container to prevent the base from losing its moisture content. Label your fragrances with their "purchase date" to ensure you are using the most potent materials first.
THE FINAL REVEAL
Observe the alignment in the step-by-step photos below. The finished product should be firm to the touch with a lustrous, satin-like finish. When you unmold your creation, the edges should be crisp and the colors vibrant. There is a profound sense of accomplishment in holding a heavy, perfectly formed bar of soap that you engineered from scratch. This First Time Soap Pouring project is more than just a craft; it is a testament to your precision and your eye for detail. You have successfully navigated the physics of heat, the chemistry of scent, and the art of the pour. Your studio is now a place of high-end production.
STUDIO QUESTIONS
What is the best temperature for adding fragrance?
You should add fragrance oils when the soap base is between 135 and 140 degrees Fahrenheit. This prevents the scent from evaporating while ensuring the oil fully integrates with the liquid soap for a consistent, long-lasting aroma.
How do I prevent my soap from being cloudy?
Cloudiness is usually caused by over-stirring, which introduces micro-bubbles, or by overheating the base. Use a slow, circular motion with a stainless steel tool and keep your temperature below 160 degrees Fahrenheit to maintain maximum clarity.
Can I use food coloring in my soap?
Food coloring is not recommended because it is not light-fast and will fade quickly. Additionally, food dyes can migrate through the soap, causing colors to bleed into each other, ruining the crisp lines of your design.
How long should I wait to unmold my soap?
Wait at least four to six hours for the soap to reach full structural integrity. If the mold feels warm to the touch, the core is still liquid. For the best results, let it set overnight in a cool area.
Why did my soap shrink after a few weeks?
Shrinkage occurs when the water content in the soap evaporates. To prevent this, wrap your finished bars in airtight shrink wrap or plastic film as soon as they are unmolded to preserve their original volume and shape.

