The snap of a dry twig is a heartbreak; the supple curve of a hydrated vine is a victory. When you dive into beginner basket weaving, you are not just playing with sticks. You are engaging in a high stakes dance with cellulose and lignin. Your hands become the primary sensors for tensile strength as you pull raw, wild materials into a structured vessel. The scent is intoxicating. It is a mix of damp earth, crushed chlorophyll, and the metallic tang of fresh sap. You are looking for that sweet spot where the fiber yields without snapping, a physical state known as the plastic limit. Mastering this craft means learning to read the grain of the woods and the moisture content of the air. We are going to transform the tangled chaos of your backyard into a functional masterpiece. Grab your gloves and clear some space on the workbench because we are about to turn local flora into structural art.
THE STUDIO KIT

THE STUDIO KIT
To dominate the world of beginner basket weaving, your kitchen shears simply will not cut it. You need a toolkit that respects the cellular density of woody vines. Start with a pair of high carbon steel bypass pruners; these ensure a clean shear through the vascular tissue without crushing the delicate xylem tubes. You will also need a stainless steel awl for creating space between tight weaves and a set of spring clamps to hold your tension while you reposition your grip. For precision measurements of vine thickness, keep a pair of digital calipers nearby. This allows you to match the gauge of your weavers, ensuring a symmetrical ascent of the basket walls.
Material Substitutions are your best friend when local vines are out of season. If you cannot find wild grapevines, look for wisteria or Virginia creeper. In a pinch, you can even use heavy gauge recycled copper wire or soaked seagrass. The goal is to find a material with high flexibility and low memory. Professional makers often use a bone folder to burnish the edges of flatter materials, ensuring the fibers lie flush against one another. Do not forget a large soaking tub. Water is your primary chemical agent here; it infiltrates the porous cell walls of the vines, temporarily increasing their elasticity so they can survive the tight radii of a basket base.
THE TEMPO
The maker's rhythm is a three act play. First is the Foraging and Hydration phase, which takes approximately twenty four to forty eight hours. You cannot rush the soak. The water must penetrate the innermost heartwood to prevent brittle fractures. Second is the Construction phase. For a beginner, expect to spend four to six hours of active weaving time. This is where you find your flow, a state where the repetitive motion of over under becomes second nature. Finally, there is the Curing phase. As the basket dries over the next week, the fibers shrink and lock together. This creates a structural integrity that no glue could ever replicate. Respect the clock, and the material will respect you.
THE CORE METHOD
1. Selecting the Foundation
The strength of your basket depends entirely on the primary spokes, also known as the radials. Look for one year old growth from vines like wild grapevine or honeysuckle. These shoots have the highest ratio of flexible sapwood to brittle heartwood. You want pieces that are roughly the thickness of a pencil.
Mastery Tip: Check the pith to wood ratio. A smaller pith means a denser, stronger vine with higher tensile strength, which prevents the base from collapsing under the weight of the finished walls.
2. Creating the Slotted Cross
Lay out four vertical spokes and four horizontal spokes. Use your awl to pierce the center of the vertical set, creating a small slit. Thread the horizontal set through these slits to create a flat, stable cross. This is the structural nexus of your project.
Mastery Tip: This technique utilizes mechanical interlocking to distribute stress. By piercing the grain rather than cutting across it, you maintain the longitudinal fiber continuity, which is essential for load bearing.
3. The Twin Weave Start
Take a long, thin weaver vine and fold it in half. Loop it around one set of spokes and begin a twining motion. Cross the two ends of the weaver between every spoke. This "locking" stitch prevents the base from wobbling as you transition from the flat bottom to the vertical walls.
Mastery Tip: Twining creates a double helix structure. This geometry is exceptionally stable because the opposing twists cancel out the rotational torque of the individual vines.
4. Upsetting the Spokes
Once your base reaches the desired diameter, it is time to "upset" the spokes. Carefully bend each radial spoke upward at a ninety degree angle. You may need to use your needle nose pliers to gently crimp the vine at the bend point to encourage the fibers to pivot.
Mastery Tip: This transition relies on the material's ability to withstand compressive stress on the inner curve and tensile stress on the outer curve. If the vine cracks, your hydration levels were insufficient.
5. Continuous Weaving
Continue weaving your thin vines in a simple over under pattern. As you run out of one vine, overlap the new vine by at least three inches. Tuck the ends toward the inside of the basket to keep the exterior aesthetic clean and professional.
Mastery Tip: Maintain consistent tension. If you pull too hard, the basket will "waist" and narrow at the middle. If you are too loose, the structure will be floppy. Use your calipers to check the diameter every few rows.
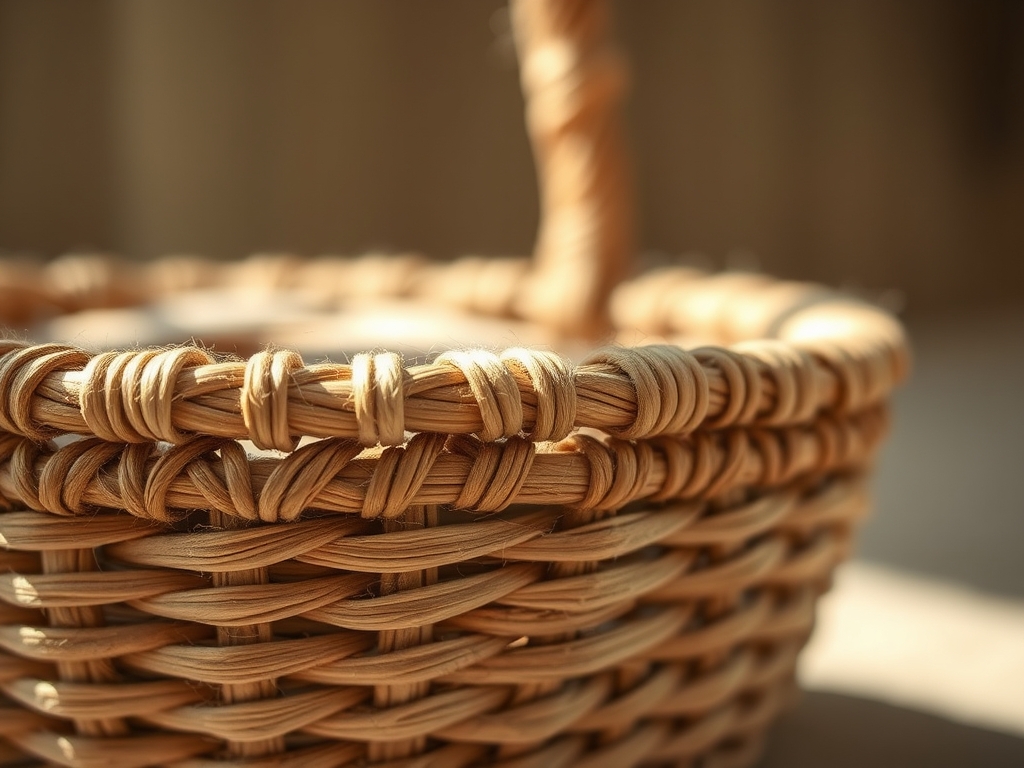
6. Rim Termination
To finish the top, bend each spoke over its neighbor and tuck it down into the weave. This creates a self locking border. For extra security, you can lash a thicker "hoop" vine to the top using a decorative "X" stitch with a very fine, flexible fiber like willow or raffia.
Mastery Tip: The rim acts as a tension ring. By locking the spokes into the body of the weave, you create a closed loop system that prevents the vertical fibers from unraveling under pressure.
THE TECHNICAL LEDGER
Maintenance & Longevity: To keep your vine basket from becoming brittle, apply a light coat of food grade mineral oil or beeswax once a year. This seals the pores and prevents excessive moisture loss. Avoid direct sunlight, which can degrade the lignin and cause the colors to fade.
Material Variations:
- Sustainable: Use invasive species like Oriental Bittersweet to help your local ecosystem while you craft.
- Recycled: Incorporate strips of old denim or leather cord for a mixed media look.
- Premium: Hand stripped willow or dyed rattan offers a uniform gauge for high end gallery pieces.
The Correction:
- Problem: The base is convex and won't sit flat. Fix: Use a heavy weight to press the center down while it is still damp to reset the fiber memory.
- Problem: Spokes are snapping during the "upset." Fix: Use a damp sponge to rehydrate the specific bend points for ten minutes before folding.
- Problem: Gaps appear as the basket dries. Fix: Use your awl to "pack" the rows tighter together while the basket is still slightly moist.
Studio Organization: Store your raw vines in a cool, dark place. If they are already dried, store them in bundles labeled by species and diameter. Never store damp baskets in plastic bags; this leads to fungal growth and rot. Use open shelving to allow for maximum airflow.
THE FINAL REVEAL
Look at that silhouette! There is nothing quite like the architectural beauty of a handwoven vine basket. You have taken raw, wild materials and used the laws of physics to create a functional vessel. The way the light catches the natural texture of the bark and the rhythm of the weave is pure magic. This isn't just a basket; it is a testament to your ability to manipulate the natural world with precision and style. Whether it is holding fresh eggs or sitting on a gallery shelf, your creation carries the energy of the forest and the skill of a master maker.
STUDIO QUESTIONS
What are the best local vines for beginners?
Wild grapevine, honeysuckle, and wisteria are ideal. They offer high flexibility and are widely available in most temperate climates. These species have long fibers that resist snapping, making them perfect for those still mastering their tension control.
How long should I soak my vines?
Soak dried vines for twenty four to forty eight hours in lukewarm water. If the vines are freshly harvested, you can often weave with them immediately. Always test the flexibility by wrapping a small section around your thumb before starting.
Why is my basket lopsided?
Lopsidedness usually results from uneven tension or using weavers of different gauges. Use digital calipers to ensure your materials are consistent. Regularly check the symmetry of your spokes against a template or a circular guide on your workbench.
Can I use dead vines found on the ground?
Avoid "gray" wood found on the forest floor. These vines have usually begun to decay, losing their structural integrity and tensile strength. Always harvest "live" vines or those that have recently gone dormant for the best results in weaving.