Imagine the sensation of raw, unspun wool sliding through your fingers; it is a mixture of lanolin warmth and structural potential. When you dive into beginner loom weaving, you are not just playing with string. You are engaging in a high stakes game of tension and geometry. The tactile feedback of chunky yarn is addictive because it offers immediate gratification. Each pass of the weft builds height so quickly that you can practically see the architecture of the textile rising before your eyes. We are going to transform that massive pile of roving into something structural and stunning. This is about more than just craft; it is about understanding how fiber density and tensile strength interact to create a stable fabric. Grab your favorite beverage and clear some space on your workbench. We are about to manipulate physics to create art. The friction between the warp and weft is what gives a tapestry its soul. By the time we finish, you will understand the mechanical secrets behind every interlocking loop.
THE STUDIO KIT
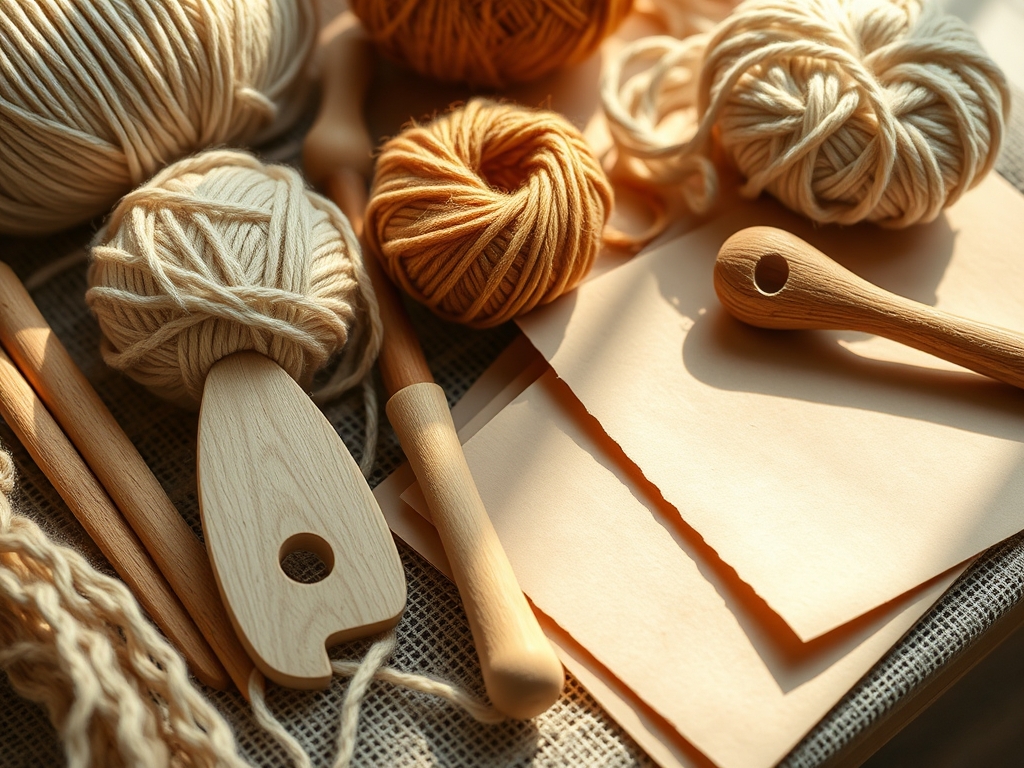
To master beginner loom weaving, your kit must be curated for both ergonomics and durability. Your primary tool is the frame loom. This is essentially a rigid quadrilateral designed to hold your warp threads under constant, even tension. You will also need a weaving sword or shed stick. This tool allows you to lift alternating threads simultaneously, creating a "shed" for your yarn to pass through. For the chunky yarn itself, look for a high ply count if you want definition, or unspun roving if you want a cloud-like, ethereal texture.
Your secondary toolkit should include a tapestry needle with a large eye for finishing ends and a weaving comb to beat the weft down. If you want to get technical, keep a pair of calipers nearby to measure the consistency of your rows. For material substitutions, if you lack a professional loom, a sturdy piece of notched cardboard can serve as a temporary frame. Instead of a professional comb, a clean hair pick works wonders for maintaining even density. Always ensure your warp thread is a high-tensile material like mercerized cotton or linen; it must be able to withstand the constant "take-up" or shrinkage that occurs as the weft winds through it.
THE TEMPO
The "Maker's Rhythm" is a psychological state where your hands move faster than your internal monologue. For beginner loom weaving with chunky yarn, the tempo is surprisingly brisk. Phase one is the warping phase, which takes about fifteen minutes. This is the most critical stage because uneven tension here will lead to a warped or "hour-glassed" final product. Phase two is the weaving phase, where the bulk of the work happens. Because we are using chunky yarn, this phase usually lasts between two to four hours depending on the complexity of your color changes.
Finally, the finishing phase requires about thirty minutes. This involves tucking in loose ends and carefully removing the piece from the loom. The rhythm of the work follows a "pulse" pattern: a quick burst of movement as the shuttle passes through, followed by a firm, rhythmic beat with the comb to lock the fibers into place. Understanding this cadence prevents hand fatigue and ensures the structural integrity of the weave.
THE CORE METHOD
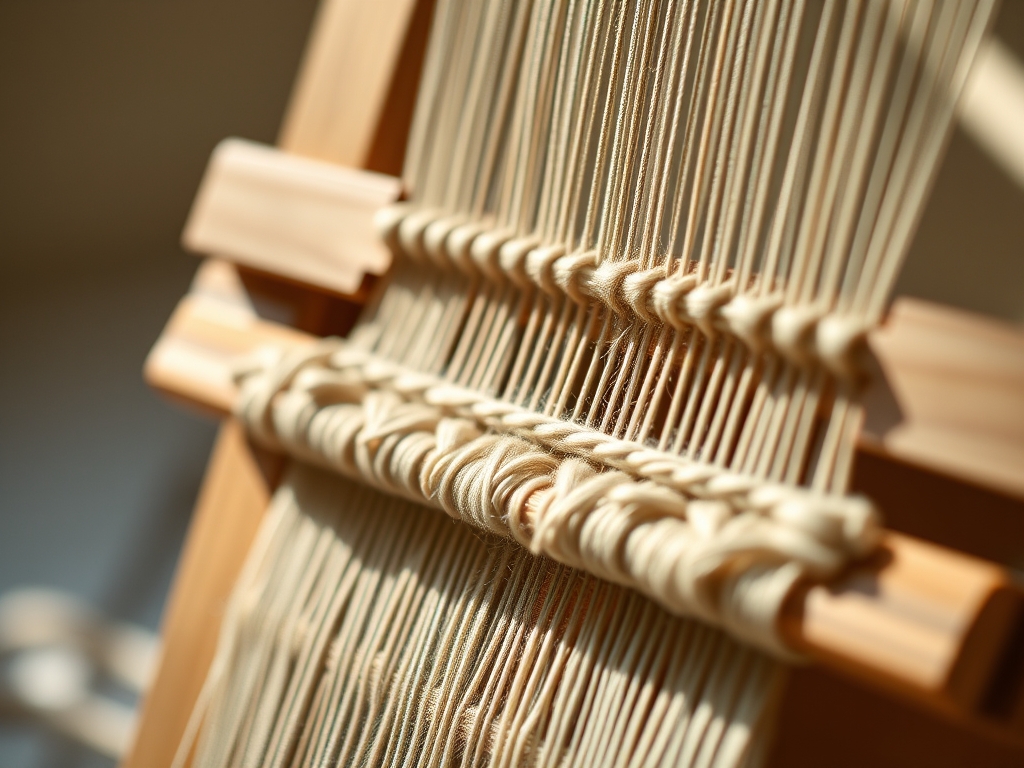
1. Setting the Foundation Warp
Before you touch the colorful yarn, you must string the loom. Secure your warp thread to the bottom left peg and move vertically. Ensure the tension is tight enough to "ping" like a guitar string but not so tight that it bows the frame.
Mastery Tip: This is all about tensile strength. If your warp is too loose, the heavy chunky yarn will cause the fabric to sag and lose its rectangular shape once removed from the frame.
2. Creating the Header
Weave a few rows with a thin, strong yarn or even a strip of cardstock. This creates a solid "shelf" for your chunky yarn to sit on, preventing the bottom from unraveling or becoming uneven.
Mastery Tip: The header acts as a structural stabilizer. It distributes the weight of the heavy upper layers across the entire width of the loom, preventing localized stress fractures in the weave.
3. The Soumak Braid
To create a 3D braided effect, wrap your chunky yarn around each warp thread in a circular motion. This technique adds incredible depth and a tactile, "bumpy" texture that defines high-end beginner loom weaving projects.
Mastery Tip: This technique utilizes torsional friction. By wrapping the yarn around the warp, you increase the surface area contact, which locks the bulky fibers in place without needing a tight beat.
4. Color Blocking with Roving
Instead of standard yarn, use unspun wool roving. Pull it apart gently to maintain its airy volume. Lay it in large, sweeping arcs rather than tight straight lines to create a "bubbling" effect known as cloud weaving.
Mastery Tip: Pay attention to fiber density. Roving is unspun, meaning it has zero twist. If you pull it too hard, you will reach the "drafting" point where the fibers slide past each other and the strand snaps.
5. Incorporating Negative Space
Leave sections of the warp exposed or use a very thin thread in between sections of chunky yarn. This contrast highlights the massive gauge of the thicker materials.
Mastery Tip: This creates a visual and physical relief. The thin sections act as "hinges," allowing the heavier sections of the tapestry to drape naturally against a wall.
6. The Bubbling Technique
When passing your chunky yarn through the shed, never pull it straight. Always create a high arch before beating it down with your comb. This ensures there is enough "slack" for the yarn to wrap around the warp without pulling the edges inward.
Mastery Tip: This prevents draw-in. Because chunky yarn has a large diameter, it requires more length to travel over and under the warp than a thin thread does.
7. Securing the Hem Stitch
Once you reach the top, use a tapestry needle to sew a hem stitch across the final row. This locks every individual warp and weft intersection into a permanent grid.
Mastery Tip: This is an application of mechanical interlocking. The hem stitch creates a redundant safety layer that prevents the potential energy stored in the compressed fibers from releasing and causing a "run" in the fabric.
THE TECHNICAL LEDGER
Maintenance & Longevity: Wool and chunky blends are porous and can trap dust. Never wash a wall hanging; instead, use a pressurized air canister (like those for keyboards) to blow out debris. To maintain the "loft" of the yarn, avoid hanging it in direct sunlight, which can cause the fibers to become brittle and lose their natural oils.
Material Variations: For a sustainable approach, use "t-shirt yarn" made from recycled jersey knit. It has high elasticity but low recovery, so tension it carefully. For a premium finish, use merino silk blends which offer a high-sheen luster and superior drape.
The Correction:
- The Hourglass Effect: If your sides are pulling in, you are not "bubbling" your weft enough. Fix: Gently use an awl to pull the edges back out before the next row.
- Loose Warp: If the warp sags mid-project, insert a bone folder or a wooden dowel at the top of the loom to act as a secondary tensioner.
- Fraying Roving: If your unspun wool is falling apart, use a spray bottle to lightly mist it with water. This increases the capillary action between fibers, helping them cling together.
Studio Organization: Store your looms vertically to prevent frame warping. Keep chunky yarn in airtight bins with cedar blocks to prevent moth infestations. Use a rotary cutter and a self-healing mat to trim your fringe for a perfectly level, professional edge.
THE FINAL REVEAL
Look at that masterpiece! The contrast between the rigid warp and the exploding volume of the chunky yarn creates a piece of art that is as much a sculpture as it is a textile. You have successfully navigated the physics of tension and the chemistry of fiber. The way the light hits the peaks of those Soumak braids creates a shadow play that makes the piece look alive. You didn't just "make a craft"; you engineered a structural fabric. Hang it with pride, knowing every loop is backed by technical precision!
STUDIO QUESTIONS
What is the best warp for beginner loom weaving?
Use a strong, non-stretchy cotton twine or linen thread. These materials have high tensile strength and minimal elasticity, ensuring your tapestry maintains its rectangular shape and doesn't sag under the weight of heavy, chunky yarns over time.
How do I stop my weaving from curling?
Curling usually results from uneven tension between the warp and weft. Ensure you are "bubbling" your chunky yarn to provide enough slack. A sturdy header and footer row of thin, tight weaving also provides the necessary structural counter-balance.
Can I mix different yarn weights?
Absolutely. Mixing weights creates "visual topography." The key is to ensure the warp spacing (sett) is wide enough to accommodate the thickest yarn while still being close enough to secure the thinnest threads without them sliding.
How do I hide the messy yarn tails?
Use a tapestry needle to weave the tails back into the "meat" of the fabric on the reverse side. For chunky yarn, you may need to split the plies and weave them in separately to avoid creating a bulky lump.